Monday, December 29, 2014

Made My own Piggy Bank

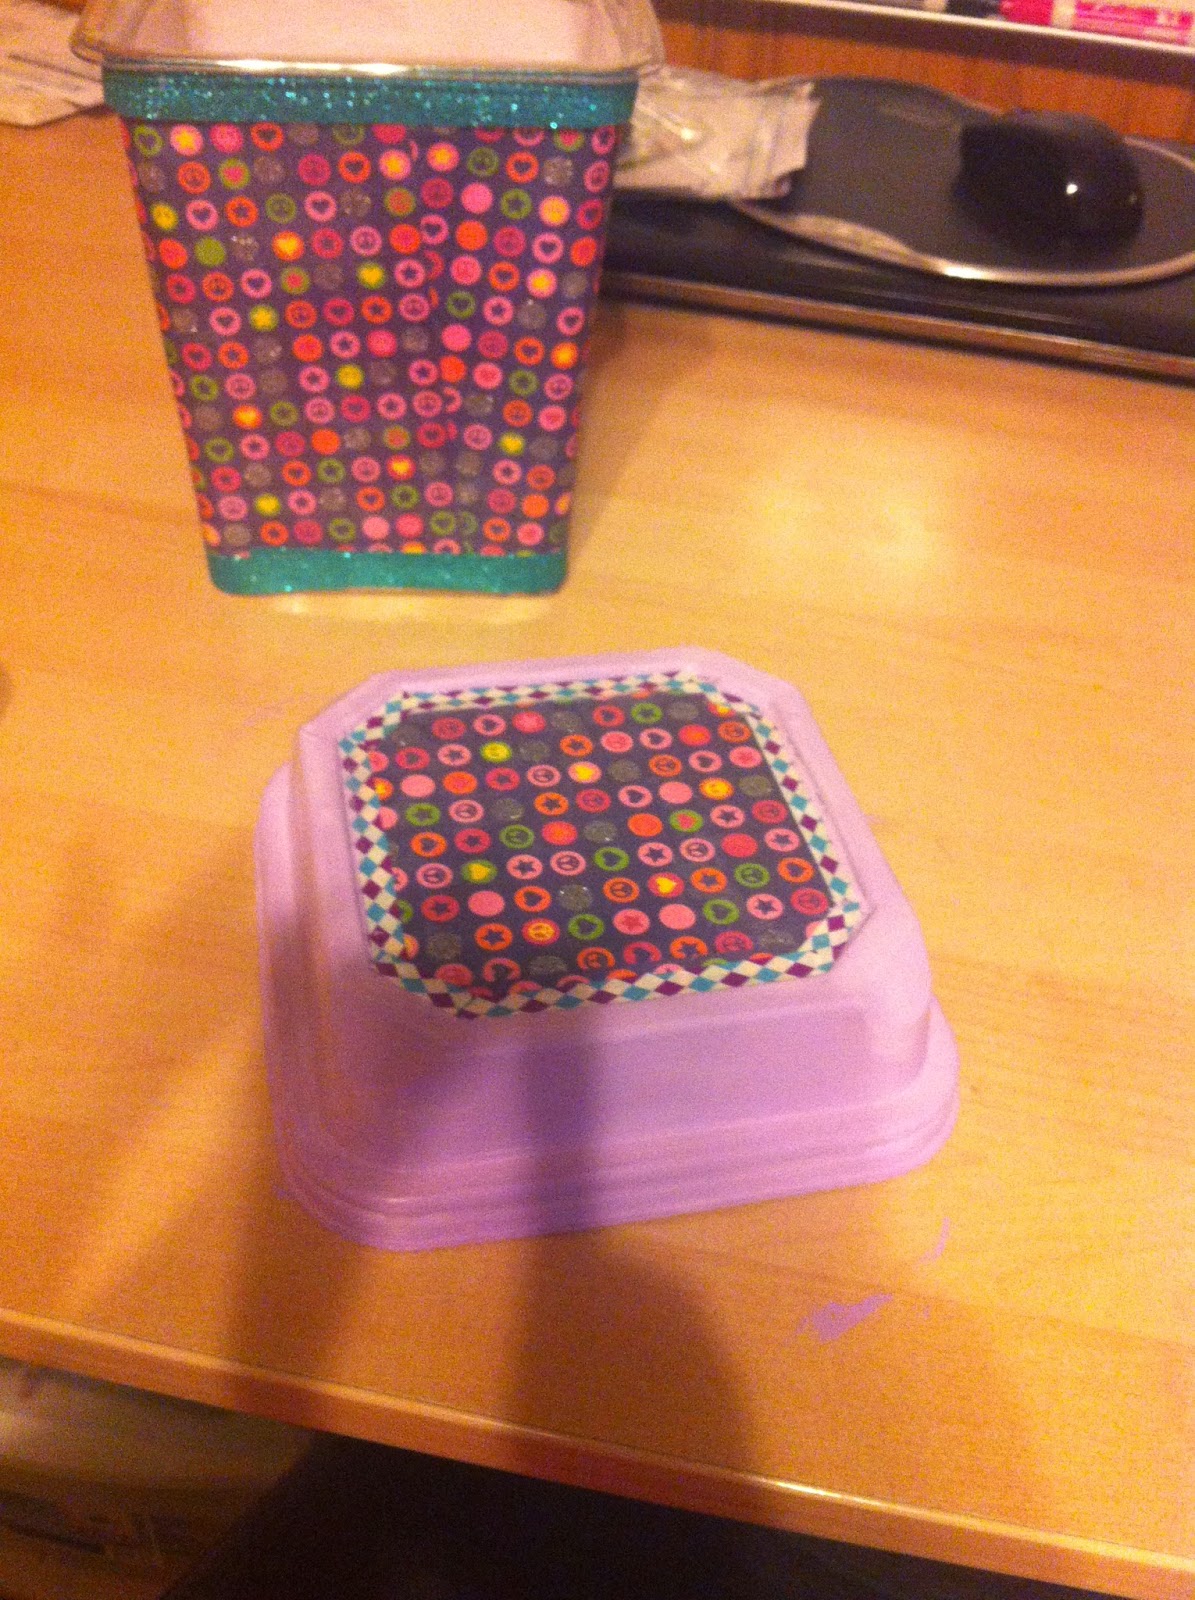
 My boss always brings candy into work and I found these Twizzlers containers just about to go into the trash- when I saved them!
I decided I wanted to have my own container to save coins and not be a coffee can. So I used scrappaper and ribbon that has adhesive on the backside. Decorated the top and added an A to the top of the lid.

 No one knows what it is for, I add whatever I have left over in my wallet on pay day so that if I have $5 or $1's they all go in there... It is nice to save it. At one point after several months of saving I had $180 in there and used it for groceries!

Halloween Lanterns

I went to an Estate Sale and found all kinds of mason jars.. I love mason jars.
I liked this idea because it was all over social media and online, plus I had all the supplies already.
I did have to run out and get more tissue, so I just went to the dollar store.
Printed out templates to use, IF the girls wanted them or they can make their own up!


Concentrating really hard!
So you add mod podge and the color tissue you want to use. Then glue and go, you can add more mod podge to the outside of the tissue as well.
Then add the face and you are done! I went and bought the lights that you can turn off and on instead of having a little tea light burning all night..  I know I  keep saying this, but the dollar store has a 2 pack and what can I say you can not beat a deal!!


Making Crayon LipGloss

We have a lot of old and broken crayons..hmm What can we do with them?
We can make candles, did that last year! Danika had asked me if we could make lipgloss, so that is what we are going to make:

Start with Crayons, dixie cups and a microwave!
Add coconut oil, we made the mistake of using too much. I thought more Coconut Oil and less crayon, but that is not the case! It melts really easy..
I had these colored pill stacker I bought at the dollar store and thought I would use them for beads or something but never used them and did not work for beads at all.. so they will be used for storing the lipgloss in!


Put in freezer to cool it down so we can keep adding without it spilling all over..


Family Turkey Hand

This is such a great idea and can be used time and time again!
So I am not sure if this is a sad moment- But the hands go Dad, Hailey, me and then Danika..
Yes the 12 year old has bigger hands than I. So we all did a trace of our hands in different color construction paper and I had printed out the Turkey head and body because I was not going to go and cut that out and I am a little of a perfectionist so it would bug me not to look like turkey.


I bought a frame at the dollar store, and used scrap paper for the background..
I used 3d glaze to bring out the Thankful for Family part. I also wrote our names on one of our fingers, so we know and this is going in a scrapbook to remember from years and years!
I wrote the year at the bottom too!

I really like this idea and it bring us all together!


Recycle Bottle Caps: Keychains, Necklaces & Magnets


I have collected these when my daughter was born, so it has been about 8 years, with some adding here and there! I got this idea on what to do with them, when my work moved locations and we were able to go to the Farmer's Market every Friday. My manager was disappointed when some lady was not there anymore that sold these bottle cap keychains with different team logos... I said I can do that! So I did, and the girls made some for the gifts for Christmas as well! I love to reuse things and make something better out of them! Now they sell them at craft stores and I pretty much got them for free! 

I painted the back of some, since they all were beer and my girls are in Middle and Elementary School, do not really want them handing out BFF on the back is budlight. ;) 
So I did these 2 ways, I bought these Epoxy 3d stickers that are so super easy makes me feel like I cheated.. You literally just added it on top of the picture you put in the cap.


I started with Microsoft word document, you do a 1" circle and then fill that circle with the picture. I bought a 1" circle cutter and made a kit for myself. This kit was just  a rectangle shoe box I bought at the dollar store, but I put everything in there I need to make these.. I bought necklace chains at JoAnn's with a coupon and they only come with 3 chains. I had to punch 2 holes into it to make it look nice with a necklace.. I looked and looked for keychains and the only place I can find them was on Ali Express. They shipped really fast, and it was exactly what I was looking for. 
 
These say Smile and I added some beads, they turned out really cool! I used most of these as necklaces, but with that being said I only bought like 5 chains.. 
I had this 3d glass from Creative memories- so this is what I used as the top glaze. Less is more! Trust me, I had to ruin a couple here and there to figure it out. I like this idea so much for birthdays to sell online maybe! The girls get a kick out of it, seeing as my daughter had pulled tons out for herself when she was suppose to be making gifts! ;) Funny girls!
We did Grandma Rocks as magnets and those are nice gifts!

The tools you will need are the following:
Bottle Caps
Key chains and or necklaces, magnets and hot glue
If you do the magnets, no need to paint the backside!
Metal Whole punch
1" diameter punch
Clear Glaze (3d lacquer) or Epoxy Stickers (1")
A printer


Making soap for Xmas gifts and for fun


I wanted to make soap with my girls. I have made these really cool cupcake bath bombs before, years ago and thought this would be really cool to do with the girls. I also put together a Holiday Boutique at work and 40% of our proceeds went to a local charity. It was really great and we made close to $200 to give to charity.
I used my Micheals coupon to but a huge tub of glycerin soap. I bought the Xmas tree mold..
I had to girls do plaid soap and cut it out in shapes.
We used Glycerin soap and colored it and added scents to it, pour in mold and you are done!
Wrap in 2 in a bag and nice ribbon and a great gift!


 This is the plaid soap- I put thin layers of 4 different colors and then sliced them in strips, all strips are different sizes.


 This is bath bombs- in the Xmas Tree molds. 
I got this recipe when I bought a kit from BrambleBerry.. They can get pricey, so if you can buy it on your own, I would!
http://www.brambleberry.com/
  • Baking soda
  • Cornstarch
  • Citric acid
  • Spritzer bottles
  • Food coloring
  • Glass bowl
  • Essential oil
  • Baking molds
  • Witch Hazel
  • STEPS

    1. STEP 1

      Sift 1 3/4 cup baking soda, 1 cup citric acid, and 2 cups cornstarch through a sieve to remove chunks. To make different tints, fill small spritzer bottles with witch hazel and add about 6 drops of food coloring to each.
    2. STEP 2

      Pour 1 cup of powdered mixture into a glass bowl. Lightly spritz, stirring after each spritz, until powder is desired color. Add water slowly, so mixture does not fizz. If mixing two tints, alternate colors as you spritz. Check the consistency of powder with your fingers; when it can be tightly packed or shaped, stop spritzing (this may take a little while).
    3. STEP 3

      Select an essential oil. Add 5 drops if it's one of the stronger scents (peppermint, lavender), 6 if it's a weaker one (lemon, grapefruit). Mix well. Firmly pack mixture into small baking molds. We used 1/4 cup for each fizzy, which is good for one bath. Allow mixture to set for 2 hours, then pop out carefully. Repeat with different tints for remaining powder.


Not edible!! ;) Made to clean and relax you!


Saturday, May 17, 2014

Making your own Easter Baskets


 Easter Baskets with YARN! Yes, belive it! You do not need much. So my friend posted hers on FaceBook and I was so intrigued and an aww.. so I had to do it myself. I was going to do it with my girls but seemed like Easter krept up on us faster than I thought. I did this on the Friday before and finished at almost midnight. I am so glad I did not have the girls do this, it was very messy and the first one took for ever to get it completed. I got 2 balloons and blew them up as big as I could. I then looked at several ways people put these together. Someone used mod podge, and I had some but that is very expensive to be using. So then I googled glue or some kind of hardening agent.. The thing I found and found it pretty quickly was called pinata glue- cheap! I ended up using flour and water. NO measuring just make it pretty liquidy. I through the yarn all in the mix. The thing is it will get knotted up if you are not careful.

 This did take me an hour to do the first one and then once I got the handle on it the 2nd time aroud and so that one took me about 45 min. All you do is just go around the balloon over and over again. I went from top to bottom and then around it. One thing I did not learn and you will have to 
 Learn for yourself is the mere fact most of the yarn gathers at the bottom and then when you go to have it stand up, it will not stand! I added feet to mine and one of them stood up funky!!

 I went to Michaels and found these flowers that are clips, they were .99 each. They are clips so I can take them off and the girls can use them for whatever they want to after. For me it took 2 days to dry... I cut the face open on Sat night and added the ribbon on the edges. Not to bad and cheaper then buying a regular basket!!


Thank you to a dear friend of mine, Katy Bruckner for this amazing idea!! 


Followers